
On 1 July 1942, Gen. Erwin Rommel was at the end of a tenuous supply line with a battle-fatigued army which had nonetheless just chased the Allies out of their last defensive position in western Egypt. The next Allied position was hastily constructed at El Alamein, a remote railway station 150 miles from Cairo. Rommel had just won a major victory by capturing the port of Tobruk and had hustled the British 8th Army out of its position at Mersa Matruh, just 100 miles to the west. His army was on the end of a tenuous supply line, but the British forces were in seeming disarray. On more push to the east seemed all that was necessary. The first battle of El Alamein was about to begin.
The Ruweisat Ridge scenario in Desert Fox is without a doubt the best of the introductory scenarios available in the Crisis in Command series. Battle of the Bulge’s “Race to the Meuse” is a fairly pedestrian proposition with essentially one-and-a-half ways to win, and the “Operation Typhoon” scenario in Drive on Moscow is too dependent on the initial German prepared offensives and first-turn attack results to be very enjoyable competitively. In fact, I’d argue that Ruweisat Ridge is the best non-campaign scenario in the entire series, period. It has multiple objectives and a wide range of openings. In fact, it can be a little daunting, especially to the new Axis player. So what would Rommel do?
1. The Ruweisat Rush

The obvious opening to Ruweisat Ridge is to go for the objective after which the scenario is named. Because of the combination of supplied units at start and the way the tracks take a circuitous route through some of the deirs, the only units available are the non-armored units of 15th Panzer Division: 33rd Recon and 115th PzG. That’s only five strength points, operating without the combined arms bonus.* Still, it’s all you’ve got. And on the plus side is the fact that you’re only facing the two-pip 1st South African Brigade. Here are your odds.
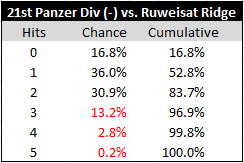
The ridge will take one hit. Units with a strength of 2 don’t retreat when they take a single hit. So it takes three hits to force 1 SA to retreat. You have an 83.7% chance of not doing that. So your chances of taking Ruweisat with this initial assault are 16.3%, or a little less than the chance of rolling a 6 on a six-sided die.
The upside to this is that if you roll a six, you are basically assured of at least a draw unless a craziness happens. The downside is that if you don’t, those two units will be vulnerable to a Commonwealth counterattack later that day (probably on the Commonwealth’s next move) and because Ruweisat won’t be Axis-controlled, you won’t be able to give those units any replacements unless you retreat them (or capture the ridge). That’s a pretty stark division between success and failure.
This also opens you up to the Tel El Eisa riposte, where the armor in Wadi El Giwiy swoops in to grab that 2VP space and you spend half the game and half your panzergrenadier force trying to take it.
So if you’re not thrilled about taking a 1-in-6 shot at Ruweisat, what’s left?
A lot.
2. Panzerschlacht

One alternative to a first-turn rush of Ruweisat is to assemble a larger force and do it on the second day. The advantage is that you’ll be able to use both of your elite panzers, and add a panzergrenadier for a combined-arms assault. The only place you can do this is Deir El Mireir (coincidentally, my favorite space name). The disadvantage is that on the second day of the scenario, you won’t just be facing the understrength 2nd South African Brigade. You’ll also probably have to contend with 4th Armored Brigade, or even 6th New Zealand Brigade (elite). But six elite panzer and three infantry strength points (with the combined arms bonus) are a formidable force in this game, especially this early.
The problem is that once the Commonwealth reinforces Rusweisat Ridge, they’ll get the second pip of ridge protection on defense in addition to whatever units they choose to reinforce with. Let’s say for simplicity that they bring in 2nd South Africans and 4th Armo(u)red Brigade from Aulad Kharuf. This gives them a -10% hit chance reduction for defending armor. Let’s calculate the odds.
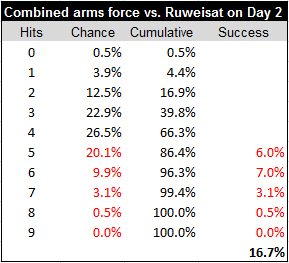
That’s crazy! A mere 0.4% improvement, at the cost of an entire day of delay, and possibly two of your precious supply points to ensure that the 5/21 and 8/15 Panzer Regiments are fueled up. The “Success” column on that chart reflects the fact that if the Commonwealth has six strength points in Ruweisat, and two hits are absorbed by the ridge, you need to inflict five hits (reduced to three) to even have a chance of forcing a retreat, and that’s only a 30% chance. A total of six hits (minus the two absorbed by the ridge) yields a 70% chance of retreat. But now you’re in the low-probability end of the distribution. Overall, you’re only up to almost exactly a 1-in-6 chance. And with both panzer units in enemy territory, you won’t be able to use a replacement point on them on day 3 if you fail.
Note that the Commonwealth can commit even more to Ruweisat Ridge on the first day if you tip your hand too early by bringing one of the New Zealand brigades north from Deir El Munassib, and using 22nd Armored instead of 23rd Armored. This still provides -10% hit chance reduction for the armor, but adds another -10% for half the force being elite. An even more aggressive defense of Ruweisat uses the 6th New Zealand Brigade from Kaponga and the 23rd Armored, not only making for a -20% hit chance reduction, but bringing the total strength to 8 (and essentially locking you out).
But even with the most generous defense of Ruweisat, you’re basically taking a 1-in-6 gamble on the ridge with limited ability to redirect your offensive if it isn’t met with success. What to do?
3. Dash past the Wire
During Operation Crusader about nine months earlier, Rommel led his Afrika Korps in a dramatic dash around the Commonwealth position known as the “Dash to the Wire.” It was a rash, probably ill-advised move, but it was so totally Rommel that it almost worked. In Desert Fox, you can make a similar dash for the eastern edge of the map. Like Rommel during the Dash, you will not have enough supplies to exit enough units to capture Egypt. However, you do have enough supplies to exit a full Italian armor or motorized division, which can easily be the VP that push you over the top.
The key to this strategy is to preserve some of your units in a supplied state, while others push forward to secure the path ahead, so that the exit dash can happen. You’ll need to get a supplied unit into Abu Shawahid or Wadi El Sakran, while preserving a long, vulnerable supply line subject to Commonwealth counterattacks. Absolutely central to your effort will be the control of El Quseir. If you leave it vulnerable to counterattack, a Commonwealth push from Kaponga can leave your units in Gebel Kalakh stranded and useless, unable to be resupplied or take replacements. You may be tempted to leapfrog your Italian units past them into Gebel Kalakh and Qaret El Himeimat, but that exposes you to another attack from Kaponga.

Fortunately, you have several advantages here. The first is mobility: all your units can move three spaces along tracks, while the Commonwealth units can only do so using unopposed movement (meaning they can’t do so to attack you). The only really mobile Commonwealth unit in the south is 7th Motorized, and it’s very vulnerable until it gets a replacement point, which won’t be until at least day 3. In the meantime, you can run circles around the slow Commonwealth infantry units.
4. Mine clearing
This isn’t a strategy in itself so much as a way of grabbing enough extra VP to supplement those gained elsewhere. It’s important to cut off Naqh Abu Dweis so that 9th Indian Brigade can’t take replacements, not because that unit is particularly dangerous (although I wouldn’t recommend letting it wander around in your rear, either) but because destroying it and clearing that minefield yields 2 VP. Just doing that and taking Tel El Eisa gets you two-third of the way to a draw. If the Commonwealth player abandons Kaponga, clearing those mines is yet another 2 VP.
5. El Alamein
Ah, the grand prize. Ten victory points wins you the game, so why not go and take it all right here? Unfortunately, because of the Commonwealth artillery bonus (shown below), it’s highly unlikely you’ll be able to take and hold El Alamein against determined opposition without taking a lot of casualties, possibly enough casualties to yield negative victory points.

A sustained infantry-only assault is suicidal, and a combined-arms attack won’t be very effective in the face of uncleared mines. The best way to deal with El Alamein is to opportunistically push with infantry while it is lightly defended in the hope of clearing some of the minefields. As long as the Commonwealth player feels that El Alamein is threatened, he or she will have to tie down significant forces protecting this space. Even if you don’t take El Alamein itself, all the armor an infantry tied up in its defense won’t be opposing you elsewhere. If you’re making gains in the south or towards Alam Halfa Ridge and the Commonwealth player has to divert forces from El Alamein, that’s precisely when you may be able to force the issue in the north.
6. Orders for a general offensive
As you can see, no single Axis strategy in Ruweisat Ridge is likely to succeed on its own. The Axis is most dangerous when they pursue a positional strategy that threatens to do multiple things at once. The Commonwealth’s problem is that they have a lot of brittle units, and cannot defend everything. The Commonwealth player will have to make some choices where to commit his or her armor strength. The -10% for defending armor is important in canceling the German combined-arms bonus, but there are only so many armor units to go around.
If the Commonwealth defends Ruweisat too strongly, you can take advantage by driving more aggressively along the southern route. If 6th New Zealand leaves Kaponga early, the Free French Brigade there will also be spent before you’ve moved anyone out of El Quseir. In that case, you can abandon the space entirely and move that whole force to Gebel Kalakh and beyond, only later slipping an Italian unit in to cover. And if you assemble a combined arms force in Deir El Mireir and find the Commonwealth absolutely fortifying Ruweisat, you can just skirt that ridge via El Himma and threaten the next set of VP locations. There is no requirement that the Axis be supplied to score points for a VP space – they only need to be supplied to exit the map.
Fortunately for the Axis, they don’t have to commit to any given strategy right away. If the Commonwealth player uses a “strongpoint” strategy to heavily garrison the victory point locations, her or she is basically inviting the Axis to dance off the map and clean up some minefields as icing. So the Commonwealth player has to shift in reaction to the Axis moves, and as he does so, the Axis can shift elsewhere. Recon units are great for dashing in and cutting tracks to isolate different parts of the battlefield from one another.
A word about supply: you should not spend it unless you have a very specific plan for what to do with the units on which you are using it. You can push mobile forces to the edge of the map, but if they aren’t supplied on the turn you plan to exit them, they’re stuck. Few things in the game are as frustrating as a recon unit poised to drive off to Cairo but being out of gas. Don’t rely on chance supply to refuel these guys: have the point(s) in your pocket first.
The Ruweisat Ridge scenario is a real game of cat and mouse, and the bluff/counterbluff possibilities make it a tense contest, especially when both players have some experience with both sides. It’s a scenario that gets better the more you play it. Only designs with multiple layers can keep showing you things as you learn them. This is one of those.
______________________________
*In the original rules, recon units were sort of “wild cards” and could be used as either armor or infantry for purposes of the combined-arms bonus, depending on which one you needed. This was removed early on as being both ahistorical and unbalancing.
Good article, Bruce!
Posted by David Hoeft | June 26, 2014, 12:54 pmGreat read Bruce. Maybe not too late to help me on my first try as Axis against a live opponent …
Posted by Will Scarlett | June 27, 2014, 9:07 amWonderful article.
Not sure it will save me, through. I’m having a brutal time against the computer opponent. Don’t want to see how badly I’d do against a human…
Posted by Tom West | June 28, 2014, 12:01 pm