
I’m not quite sure exactly what it is about wargames that befuddles people. Something about NATO symbology* which translates armored units into rectangles with ovals in them. Or hexagons. I know some people don’t like hexagons. Although Neuroshima Hex has those as well, and it does all right.
I think the biggest obstacle to playing wargames is all the weird things you have to be aware of to play a game properly, without any way to judge how important they may be. Wargames sometimes make you use tools that you often didn’t even know you had. One of those is unit breakdown.
I don’t mean your Panzer III blew out its muffler or your Kubelwagen needs an oil change. I mean taking a perfectly good panzer division and breaking it down into some smaller units, which in this game totals three panzer regiments**. You can do that. But why would you want to?

There is this button at the top of the screen where all the interface buttons live, and when you hover the mouse over it, a tooltip says, “Build-up/breakdown units”. It happens to be between the “Toggle factory location on and off” and “Create fortified unit in selected hex” buttons, which I think are probably two of the most useless buttons I can think of. But in between is this “breakdown” button. Probably useless as well, right? If you have more than one unit in a hex, clicking it isn’t going to do anything, because it will cause you to violate the stacking limit by putting too many units in the hex. So if you try it then, it might just seem broken.
“Hey, aren’t these wargames supposed to have a lot of bugs?” you might think to yourself, as you click the button a few times. “I remember hearing that people who play them like to feel like they’re in the old days of computing, when your computer caught fire when the punch cards got out of order”. So you chalk it up to a deliberately non-functional interface item and move on.
Except that button happens to be extremely useful. Especially in a game where you are trying to create large encirclements.
Just like the Germans didn’t have enough troops in 1942 to replicate the massive front-wide offensive of 1941, you don’t have enough troops in the Case Blue scenario to complete all the encirclements you’re going to need.
Encirclements in War in the East are a big deal. If you defeat a unit in the open field by getting one million odds demerits against it, it will generally rout, taking some casualties and going far away somewhere. That may seem great, except that those units eventually rally and come back, and there is this thing in War in the East that if your attack is too powerful, you actually do less damage than you probably should. So just blasting units each turn as the Germans is not the best strategy, not least because you get victory points for inflicting casualties. Which is where encirclements come in.
A unit which cannot trace a valid line of supply at the beginning of its turn is isolated. That means:
An isolated unit (15.12) that ends its retreat adjacent to an enemy unit will surrender if Die(50) is greater than the morale of the unit. Units that are isolated or in beachhead supply status will surrender if they have no permissible hex to which to retreat. Fortified Regions and Zones that are forced to retreat will always surrender. Combat units that are in supply will rout if they have no permissible hex to retreat to.
That’s all fancy talk. Basically, if a unit is isolated and loses a combat, it will probably surrender, which means it goes away forever***. But this sentence is important:
Note that units cut off in the opposing players turn don’t gain isolated status until the next player’s turn in the logistics phase.
This means that if you cut an enemy unit off during your turn, you won’t get to attack it in its isolated state until your next turn. In between those two things, the enemy turn will happen. And it’s pretty certain the enemy will try to break the encirclement then.
The AI is pretty good at breaking encirclements. Because you can trace supply through an enemy zone of control if the hex is occupied by a friendly unit, the AI will try to find weak spots and push attackers through, creating a chain of units into the encirclement. Usually it just means finding enough units with high movement factors to move through the zones of control. During the AI turn, if you watch, it will even show you the hexes it’s thinking about. Pretty nifty.
Of course, you have to break the enemy line yourself to create the encirclement, and we talked a bit about this at the end of the last entry.
If you thought you had to be some kind of von Manstein to pull this off, turns out it is more like some kind of Gottfried Leibniz. Getting motorized units in behind the enemy line can be tricky. Movement slows down drastically for moving through enemy zones of control, as we saw before. But just the act of attacking costs movement points, and terrain can mess things up further. Specifically, rivers. Check out the attack costs chart below.
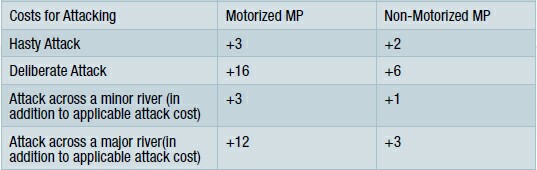
A hasty attack (combat value halved) costs 3 MP. Attacking across a river doubles that to 6 MP. Just moving into a clear hex in enemy territory costs 2 MP. A fully supplied German motorized unit has 50 MP. And in this scenario, it has a long way to go.
Rivers don’t just slow down attacks; they make them less effective. Exactly how much less effective? Why don’t we check the manual?
Combat units attacking into a hex through a non-frozen (ice level four or less) minor or major river hex sides are required to expend additional movement points above the normal attack MP cost. All ground elements that cross the river to attack are subject to a disruption check prior to the initial computation of combat value. Ground elements with longer range indirect fire devices will normally not check for disruption while infantry and combat engineers most likely will check. Infantry type ground elements will tend to suffer approximately the same amount of disruption for both minor and major rivers, but AFV and combat vehicle ground elements will suffer more disruption in crossing a major river than a minor river. Since disrupted combat units do not contribute to overall CV, players can anticipate a reduction in overall CV of up to half for minor rivers and up to two-thirds for major rivers prior to any other modifications.
Did you notice all the “will normally” and “most likely” wording? Sounds to me like there are a lot of complicated exceptions to this, all of which I’m sure exactly model the world as it existed on the Russian steppe in the 1940s. For me, on the last day of 2012, I’ll just go with the “half-strength” rule of thumb.
So this creates some tricky math. In order to get units into the Soviet rear areas, I need to have one unit clear a path until it runs out of movement points. Then I can get another unit to drive through and pick up from there, since it won’t have spent extra movement points while attacking. But what about those rivers? If it takes a single unit to defeat the Soviet units in clear terrain, it will probably take both units to successfully attack across a river. Burning more movement points. And there are a lot of rivers.

Remember that I need to clear out a path that allows my units to drive through without having to move directly from one zone of control to another. So you can see how the defender can use the river line in the screenshot above (emphasized in blue) to force me to make multiple cross-river attacks, and spend precious movement points. Some of those are against units I already attacked, who just retreated across the river and made me hit them again.

So after all that, we ended up with 9th and 11th Panzer Divisions firmly behind the many units of what represent the Soviet 40th and 21st Armies. But as you can see below, there is plenty of space between those units for the AI to re-establish contact with the encirclement.

Which is where breakdown comes in.
By breaking down both panzer divisions into three regiments, I can establish an unbroken line of units. A line that requires successful attacks to break, rather than just enough movement points to squeeze through.

But it’s not a complete encirclement until the southern pincer arrives, which is the job of XXXX Panzer Corps driving northeast from Kharkov. Those units have an easier job, both due to terrain and Soviet dispositions, and after breaking the southern panzer divisions into regiments, the encirclement of 21st Army and 40th Army is complete. I even have a whole motorized infantry division to put in an advanced position and discourage Soviet counterattacks.

There are a couple loose ends to tie up, and I saved an entire panzer corps (XXXXVIII) for this purpose up north. The goal of Blau I (Operation Blau, Phase I) was the capture of Voronezh. Driving north of the encirclement, I run into the same problems. Units I attack just retreat and force me to attack them once more, but now are combined with units that had been positioned behind them. Again, I have to manage the movement points of the individual units. I save one panzer division solely to secure a bridgehead to the northwest of Voronezh, while a motorized infantry division gets behind the Don River to the southeast to make a counterattack from that direction prohibitively expensive.

Now it’s time to hit the “End Turn” button and see if the Soviets can escape the trap. In To the Gates of Stalingrad, David Glantz describes the destruction of 40th Army, and then turns his attention to 21st Army.
To the south, Danilov’s 21st Army and Shurov’s 13th Tank Corps suffered an even more tragic fate. Unable to even slow Sixth Army’s furious advance northeastward, Danilov ordered his forces to begin their breakout westward toward the Oskol River early on 1 July. Danilov employed Shurov’s tank corps, which had already lost more than half of its 163 tanks, both as a battering ram to penetrate through Paulus’ cordon of infantry, and as a shield to protect the army’s escape. After a running two-day fight, during which Shurov was mortally wounded and two brigade commanders perished, the remnants of Danilov’s army reached the Oskol River near Chernianka late on 2 July. Once along the Oskol, Danilov’s forces, also organized in small groups, tried to escape by exploiting the gap between Paulus’ advancing infantry divisions farther to the south. Like Parsegov’s 40th Army — losing more than half its men and all the equipment during its retreat to the Don and Tikhaia Sosna Rivers — Danilov’s army was no longer a viable combat force.
But in this digital encirclement, there are no gaps between infantry divisions. There are no gaps anywhere. The remnants of 21st Army attempt a breakout slightly south and east of their historical location, but all they meet is an unbroken string of Germans squares and rectangles. The game does not model the messiness of eastern front breakouts. Instead, a new turn starts with all the Soviet troops in the pocket out of supply. All will surrender during this turn.

All because of the unit breakdown mechanic.
____________
*If you ever want to befuddle a wargamer, just break out a copy of Avalon Hill’s The Longest Day and show them the unit symbology, which is the German WWII system. Confusing!
**A totally crazy rivet-counting aside on my part: a 1942 German panzer division did NOT break down into three panzer regiments. It broke down into two panzer regiments and a motorized infantry regiment. And there were four German panzer divisions that actually had only a single panzer regiment. So the idea of “breaking down” a panzer division into three separate panzer regiments is not technically correct. But then, neither is taking the number nine, drawing it on a rectangle with an oval in the middle, and calling it the 9th Panzer Division.
***Some part of the unit goes on to form partisans. But for the most part, the unit is eliminated completely.
Hi Bruce, it is great being able to get all of your stuff in one hit on one site – but it might be handy to adf part numbers to the series so newcomers can read them in the order intended. Cheers!
Posted by Trithemius | May 17, 2014, 10:47 pmThanks for the suggestion. I do intend to put links at the bottom of each piece with a “Go to next” as well as “Go to previous” and “Go to the beginning of this series” so that new readers can get oriented just as you mentioned. I just need to find a spare hour.
Posted by Bruce Geryk | May 18, 2014, 9:33 pm