
If you read my previous game diary about War in the East, you might be all ready for me to start playing Eagle Day and RAF, pull a few history books off the shelf, find some random paragraphs that support whatever point I’m making at the time, and still manage to lose the game. You must think that– like the people I write about — I haven’t learned anything from the last war I fought.
Tim Stone, PC Gamer UK’s wargame guru who is probably much less familiar to American readers than he deserves to be, wrote a great piece for Rock, Paper, Shotgun a couple months ago, which conclusively demonstrated the wargame analogue to the Chick Parabola, which we can call the Stone Curve.* Tim asserts that while you have to have a certain amount of historical knowledge to enjoy a wargame, having too much knowledge will ruin it for you. The midpoint on the curve is where you’ll get maximal enjoyment: enough to appreciate the historical touches, but not enough to recognize (and be disappointed by) the mistakes.
Well, you got me there.
It’s true that if you’re out to touch history, it doesn’t help if your game jacks it all up. But for players interested in historical game design, a flawed game can be interesting for its mistakes, or at least until you figure out why it doesn’t work. And comparing multiple games can be more interesting still. At least that’s the story I’m going with.
The Battle of Britain is a much different conflict in game-design terms than the Eastern Front. It’s also a completely different conflict in non-game-design terms. It resembles a sporting event in that it was fought in discrete elements of time during which you can pretty much figure out exactly what happened. Most of the records are available, and historians have done a good job examining them. Reading multiple histories of the battle gives you a feeling of familiarity as you hit upon the same incidents and stories again and again. The low-level attacks on the radar stations on August 12. Eagle Day on August 13. The first (and last) flight of Luftflotte 5 on August 15, or “Black Thursday”. The “hardest day” on August 18. The switch to London (and the beginning of the Blitz) on September 7. You know pretty much how many aircraft were lost on each side, because they recorded this stuff.** But unlike the encirclement battles on the eastern front, a few casualties here or there made a huge difference. The number of operational single-seat fighter aircraft on each side (Spitfires, Hurricanes, and Bf 109s) never exceeded a thousand. It gives each counter in the game a special significance, because that’s all there was. If nothing else, it’s a much more personal war.
It’s also much more amenable to analysis. There were only so many raids on any given day, and each had a target and a result. A simple test for any design should be whether or not historical tactics produce historical results (which in this case can be easily verified). If not, you might wonder why. But what about ahistorical tactics? Can they win you the game? And if so, what does it say about the designers’ historical assumptions?
Like Operation Barbarossa, the Battle of Britain has its own myth, and it goes kind of like this: the Germans had this huge Luftwaffe, with which they set out to crush a numerically inferior Royal Air Force. However, the British had the secret advantage of radar, which the Germans didn’t understand, so they tried to bomb it but gave up too soon, then bombed the British airfields, and that came soooo close to winning the battle for them until Hitler went crazy and switched targets to London and terror bombing, taking all the pressure off Fighter Command, and suddenly — poof — German defeat.
It’s a nice story. Like Barbarossa, it has been subject to years of historical exploration and revisionism. I’m not going to go through all of it, because I’m not a trained historian and this isn’t a historical essay. But there are a couple revisionist points which bear directly on the game design, and the most important one is that the Germans had absolutely no chance of winning. Sound familiar?
The traditional understanding of the goal of the battle is that the Germans wanted to establish air superiority over southern England in order to facilitate Operation Sealion, Hitler’s codename for the invasion of the British Isles. As a game designer, that forces you to choose the conditions for “air superiority”. If you think it means “wiping out the R.A.F. completely” then you need to put down your mechanical pencil, or whatever you are using to write out your FORTRAN code, and think of a different idea you could perhaps turn into a Luftwaffe theme. Like maybe Angry Birds. Because no one is going to play your unwinnable Battle of Britain concoction. But if it’s not that, then what is it? A 3:2 fighter superiority? Maybe a “secret objective?” Bombing all cities that begin with the letter “e”?
Gary Grigsby has designed a lot of wargames. He’s particularly prolific at thinking up algorithms and formulas. For Battle of Britain slash Eagle Day, he thought up this one: take all the “ready aircraft” on each side. Give each player one point for each ready aircraft he has. Then give the Germans three points for each point of damage caused to the service and communications areas (not runways) of primary airfields in Sectors 10, 11, and 12 (which basically comprise south and central England and Wales, and exclude Scotland). Lastly, divide the German points by the British points. If this number (called the Air Superiority level) is 8 or greater at the end of any turn, the Germans win.
I have two confessions. The first is that I have no idea how this corresponds to the actual historical result if you took the factors in question and tried to make a real-life Air Superiority level out of them. The second is that I have no intention of trying to find out. For all I know, the real-life Luftwaffe won in Grigsby terms on day three, but no one bothered to show Hitler a victory screen.
But I kind of doubt it. The most favorable German-to-British aircraft ratio was probably at the start of the battle, when it was around 3,000 to 1,000, or 3:1. The game calls this Air Superiority 3 (and it’s the level at which the game starts). Over the whole course of the battle, the only R.A.F. primary airfield (as defined by the game) that was ever “knocked out” by this definition*** was Biggin Hill, and that was only briefly on August 30th. Even if you say the Germans achieved 100% damage to both the service and communications areas (which they didn’t), and give them 600 points for it, that doesn’t even get them to Air Superiority level 4. Non-runway damage to other primary airfields was negligible, but let’s be generous and give the Germans another 400 points for that. That makes 3,000 + 600 + 400 = 4,000. Divide that by 1,000 British aircraft, and you get 4:1. That calculation is pretty rough, but it sure doesn’t sound like the Germans even got close to Air Superiority 8.
So how close did the Germans make it to the other victory level, the “combined” score where air superiority, industry damage, and terror raids need to add up to 12? Probably not close. Damage to British industry was even less significant than airfield damage. Repeated Luftwaffe raids on Portland failed to cause substantial damage to the port. Major terror raids didn’t start until 7 September, by which time the threat to the airfields was over (and the Germans would have lost their airfield damage points, as they only score for “current damage” and lose points when it is repaired). If the Germans couldn’t get to Air Superiority 8, I can’t imagine that they got close to a combined level of 12.
But does that mean they couldn’t have? Stephen Bungay’s mostly outstanding Most Dangerous Enemy does a lot of analysis. Here he talks about the different German approaches to knocking out the RAF.
There was in all of this a discernable pattern which, had it been properly recognized, could have gained the Luftwaffe some measure of success: early attacks on radar stations to put them down for a few hours, followed by low-level attacks on the Sectors. The Luftwaffe could not destroy the system but it could disrupt it for short periods and do a lot of damage while it was out of action. But only low level attacks would work. The casualties suffered by 9./KG76 and by Erprobungsgruppe 210 convinced them they were too costly, but the widespread use of such tactics could have put Park under enormous pressure.
If you’re a game designer, this statement runs up against two problems. The first is that attacks on the radar stations were generally ineffective. The second is that the Germans, for the most part, didn’t engage in a lot of low-level attacks. How are you going to model two things that didn’t happen? You just have to extrapolate as much as possible, and then make a decision. In future installments, we’ll find out which decision Gary Grigsby made.
So how about John H. Butterfield, the designer of RAF? Butterfield was one of the most innovative wargame designers of the 1980′s, with games at SPI and Victory Games to his credit, including Voyage of the Pandora and the groundbreaking solitaire Ambush! Butterfield went on to design Baseball Manager, a multiplayer baseball simulation on the Prodigy network in the early 1990s. He also designed Battle Over Britain, a big two-player boardgame from TSR (as part of the SPI line after the purchase of that company). RAF is his second Battle of Britain game, and in his designer’s notes in the back of the rulebook, he makes a little confession.
Yes, the Germans lost, and historians agree that they had very little chance of winning.
Whoah! Giving up so soon? If the Germans had no chance of winning, then how satisfying can it be to defeat a solitaire system that starts out already beaten?
Actually, it’s not that surprising a comment. Lots of wargames depict “unwinnable” situations (such as the Battle of the Bulge) where your real measure of success is how you do compared to the historical participants. Butterfield’s solution is the date of Operation Sealion. If you can convince Hitler to cancel the invasion before September 11, you win a decisive victory. If Sealion is canceled between September 11 and September 22, you win a tactical victory. If the invasion is postponed beyond September 22 but not canceled, the game is a draw.
If Hitler orders Operation Sealion, you lose decisively.
This sounds like a superficially reasonable idea, setting aside for the moment that even if Hitler had ordered the invasion of England, its success was in no way guaranteed. (Some have postulated that such an attack was doomed to fail regardless of the air situation, and the Allies would have won the war much sooner if the Germans had managed to defeat the RAF and launched the invasion, as the subsequent catastrophic defeat would have set the Nazi war machine back for years. Big winner? Russia.) But whatever. What if Hitler had lived on the Moon? Exactly.
But how do you decide if Operation Sealion is canceled, postponed, or given the go-ahead? Hitler Mindset Simulation? Butterfield uses a victory point system combined with a date marker: compare the victory point value each day of the campaign to a predetermined range, and adjust D-Day for Sealion accordingly. With a victory point system like this, Hitler can be made to order Sealion under virtually any conditions. So deciding these conditions boils down to “what would Hitler do?” Which brings us back to the whole air superiority thing we started off talking about a few pages ago.
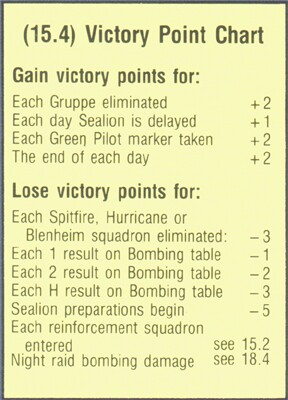
Having played RAF several times back in the day, I think I have a pretty good sense for what Butterfield sets as the bar for a German invasion. Just by looking at the Victory Point Chart (pictured above) you can see that destroying British aircraft and successfully bombing British targets are the ways the Luftwaffe scores. Big surprise.
But here’s the thing: the Germans score points for successfully bombing anything. The game sets German target priorities as radar, airfields, industry, ports, and cities. If the Germans send a raid to the naval base at Portsmouth, it’s just as dangerous as a raid headed for Biggin Hill, Kenley, Hornchurch, or any of the major RAF airfields in 11 Group. Crazy? Yes.
The rationale for this is obvious: if the Germans are going after British ports, and you realize that historically this is a losing strategy, you can just decline to intercept the bombers, which would never have been acceptable in practice. (Air Chief Marshal Dowding’s ultimate downfall can at least partially be attributed to his inability to develop a night fighter quickly enough to deal with German night bombing, a problem which had absolutely no strategic impact on the war). So it makes sense in the context of a solitaire game because it forces you to intercept large raids (those likely to cause more damage and, therefore, score more victory points) because the alternative would allow you to evaluate raids within the context of a known game system, which obviously wasn’t the situation Fighter Command was in, so much.
It’s this difference in assumptions between board wargames and those on the computer which I find so interesting. There is an obvious implication in Eagle Day that there is some magic solution to scoring points in such a way that you’ll be able to push the Air Superiority level to 8 or higher. But so many factors go into this that it’s almost impossible to work this out in advance. More on this later. In RAF, you’re reacting to a system where you can assess individual threats (the raid you’re dealing with) as they come, because you know the rules. But you don’t know what’s coming next. I can’t wait to start playing.
___________________________________
*name coined by Quarter to Three poster Ginger Yellow in the RPS comments
**One of the great moments in the historiography of the Battle of Britain came 30 years later, when the records were declassified and the general public realized that the RAF had shot down far fewer German aircraft than they had initially claimed.
***Hough and Richards state that Kenley’s Sector Ops Room was out of action for fifty hours after the raids of 18 August. Bungay states that it was for two hours. Heck if I know.
I was debating purchasing RAF-The Battle of Britain 1940. This article and the last one helped me pull the trigger. Bruce, thank you for your work.
Posted by Cyrus | March 8, 2016, 1:55 am