If you’re wondering where “The Spaces of War I” is, you should pick up the Player’s Guide to Battle of the Bulge, which is a $0.99 in-app purchase in that remarkable game. Shenandoah is planning a Player’s Guide to Desert Fox. It will have articles like this one.
It may seem that the 61 spaces on the Desert Fox map are so much featureless desert. That’s probably what the historical combatants thought. But in the absence of dramatic, battlefield-defining landmarks, the more subtle undulations of terrain in the Egyptian desert developed into important features to rival the importance of the rivers, forests, and hills of more conventional battlefields. The unique combination of ridges, tracks, and deirs in the iOS version of this famous battle breaks down in some interesting ways. Not all sand dunes are created equal!
THE BIG RIDGES
Two of the ridges in the game dominate the battlefield. In the historical battle, the Germans never took either one. If they had, the outcome might have been quite different.

Ruweisat Ridge (Ruweisat Ridge, Gebel Bein Gabir)
These two spaces are the key to the early Commonwealth position. Losing them splits the Commonwealth position in half, and effectively isolates El Alamein from the rest of the line of defense. But the spaces themselves have very different characters. Ruweisat controls tracks that allow armor attacks into three separate deirs (Deir El Abyad, Deir El Munassib, and Kaponga) as well as the north-south reinforcement route. Gebel Bein Gabir is devoid of tracks. But that gives this trackless wasteland a special quality: it can’t be reinforced by Commonwealth infantry units that aren’t adjacent to the space. This often manifests itself by a German recon unit slipping in from Deir El Mireir when the Commonwealth is napping, and then no infantry is available to take it back. The Commonwealth armor can’t be everywhere at once in the early game, and this stratagem can completely unhinge the defense of Ruweisat Ridge, especially if quickly reinforced.
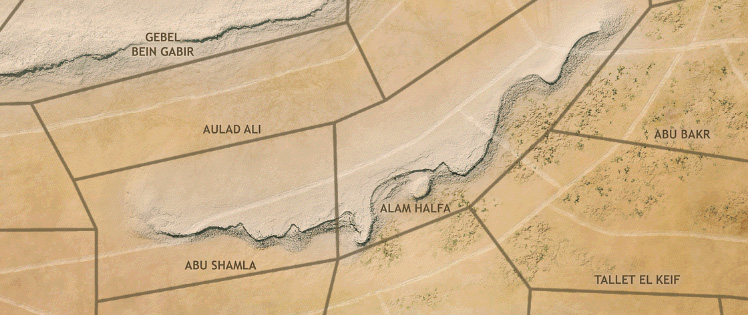
Alam Halfa Ridge (Abu Shamla, Alam Halfa)
These two spaces are the key to the late Commonwealth position. Any mobile unit can exit from Alam Halfa, and the threat of cutting the coastal road from there forces the CW to spread its defense all along the line from El Hammah to Tallet Sultana. As the Commonwealth, never, ever let the Axis in here. As the Axis, breaking into Alam Halfa early (before the Commonwealth gets the combined arms bonus) can be the tipping point in the struggle to thrust the Afrika Korps units off the east edge of the map.
THE LITTLE RIDGES
There are three other “ridge complexes” in the game, each of which occupies a unique space in an otherwise mostly flat landscape. Ridges are better defensive terrain than deirs because they can provide two hits of protection if defended by three or more strength points of units, as opposed to the single hit of protection from deirs.
Kidney Ridge, Tel El Eisa: These two spaces are the glacis of the Axis position, and should be heavily mined as soon as it becomes clear the Axis are not going to exit to Cairo. The Commonwealth can throw a spanner in the works by grabbing Tel El Eisa early in the Ruweisat Ridge scenario, delaying the Axis drive on El Alamein and forcing them to fight for an extra 2 victory points. In the longer time frame (and absence of victory points) of the campaign, this isn’t as viable an option.
Naqh Abu Dweis, Taqa Plateau: The southwestern edge of the map is a forgotten backwater for the first three quarters of the game, although the forward-positioned 9th Indian Brigade on the ridge in Naqh Abu Dweis is worth 1 VP in the Ruweisat Ridge scenario, as is the minefield. Combined with 2 VP for Tel El Eisa, this is two-thirds of the way to a draw. In Second Alamein, this ridge will likely be the only way back for poor Folgore Infantry Division, abandoned by its German allies at the southern end of the minefield line. While the Taqa Plateau ridge can be bypassed, Naqh Abu Dweis is an exit space and cannot be, and the latter space often spells safety in the transliteration peculiar to the desert.
El Miqatta’at, El Egul: These two ridges might seem even more insignificant than the southwestern ones as they only figure in the campaign game. But woe to the Commonwealth player who doesn’t garrison them in the face of a strong Axis push in the south. If the Axis try to exit through Tallet Sultana, a strong counterattack through Tallet Falih can leave these units trapped, unable to exit, and that can be best launched from the protection of El Miqatta’at. Remember that even if Axis units are supplied, they must be able to trace a valid supply line at the time of exit. Axis exit is often a fortuitous combination of just enough supply at just the right time. The Commonwealth can upset this timetable with good positioning and timely counterattacks.
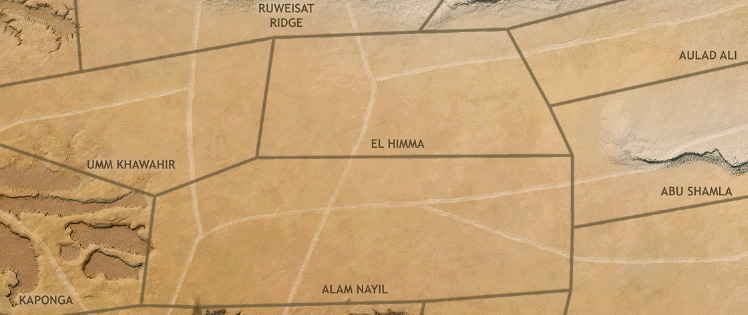
Levers of power (Aulad Kharuf, El Himma, Alam Nayil):
Each one of these spaces pushes on different, more important spaces: El Himma on Ruweisat Ridge and Abu Shamla, Alam Nayil on Abu Shamla and Kaponga, and Aulad Kharuf on Ruweisat Ridge and El Alamein. But these are more than simple adjacencies: each of these spaces threatens bypass and exploitation, as though the key spaces were just props, manipulated at the whim of the real power behind the thone. In the right circumstances, controlling these levers can be as important as controlling the thrones themselves.
Continental shelf (Abu Bakr, Ilwet El Baragi)
Just as the littoral shallows drop off to the abyssal depths, the two spaces abutting Alam Halfa are the Commonwealth’s last line of defense before dropping off into the void of the map-edge spaces. If the Axis have Alam Halfa, the Commonwealth will need to cling to these spaces for dear life. Placing some prophylactic mines here early on can help keep the situation from getting desperate later. Note that Tallet El Keif also falls into this category, but it has a second, more important function below.
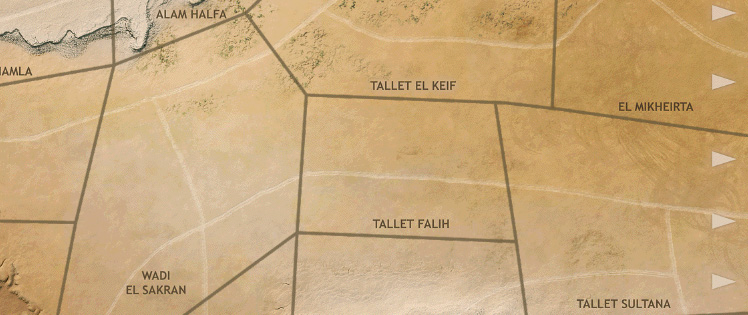
The Great Divide (Tallet El Keif, El Mikheirta / Tallet Falih, Tallet Sultana)
These four spaces delineate an important aspect of the eastern edge of the desert, in that the roads here do not run north-south. It’s a point that’s easily missed until the Axis show up on the doorstep and the Commonwealth player needs to reinforce the position … and realizes that infantry reinforcements can’t get south of the dividing line in one turn. As the campaign drifts towards the Axis apex, the Commonwealth needs to have adequate units south of the divide, or the Afrika Korps will be able to escape before units can be redeployed. Tallet El Keif is especially important as it grants access to the north-south track running through Wadi El Sakran. Note that German recon units are unaffected by this problem!
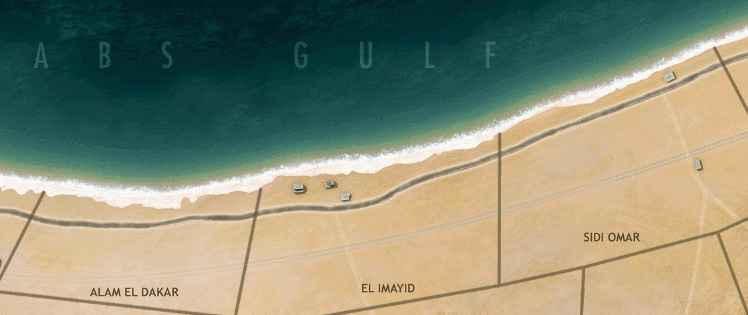
The Coast Road (Alam El Dakar, El Imayid, Sidi Omar)
Controlling the coast road means preserving the ability to bring reinforcements straight into El Alamein when they enter the map. Cutting this road with a northward thrust will go a long way toward choking off El Al’s defense, and is something Rommel tried again and again to do without success. Remember the second paragraph of Rule [8.1]: any coast road space that can trace a line of friendly spaces to the west edge of the map serves as a supply source. This is crucial for improving Axis resupply chances later in the game.
The cornerstones (El Daba, El Hammah)
More symbolic, perhaps, than crucial, these are still the alpha and omega of the desert campaign. New troops appear here, and once they are under threat, the battle has reached a climax. El Hammah will generally see much less combat than El Daba, but when the battle does reach it, it usually heralds a Götterdammerung for the Commonwealth.
The cork in the bottle (Qaret El Himeimat)
Any Axis southern thrust depends on a long, tenuous supply line running along the southern map edge. It’s vulnerable in several places, and just like El Quseir and Gebel Kalakh are at the mercy of strong Commonwealth forces protected by the Kaponga deir, Qaret El Himeimat is exposed to a possible thrust from Deir El Munassib. Once the Axis get established here, they can either turn northeast and strike for Abu Shamla, or blitz directly east heading for Cairo.

The wedge (Umm Kawahir)
The fact that Umm Kawahir isn’t adjacent to the main Axis north-south track running from Sidi Abd El Rahman to Gebel Kalakh due to its odd shape means that sneaky recon units can get cut off here unless the Axis is careful. But the bigger mistake can be pushing panzers from El Quseir through Deir El Mireir to this space, and then realizing that even if you control Deir El Mireir, your panzers can’t retreat! While armor can exit from Deir El Mireir to Umm Kawahir, it can’t get back this way. It’s a great trap to lay for unsuspecting players, who almost certainly never repeat their mistake. You really can’t get there from here!
The causeways (El Agram, Aulad Ali, Samaket Gaballa)
These are the single-track highways between here and there that are likely to see armored vehicles whizzing back and forth across them. Defending in them is like standing in a gully right before an avalanche hits: the best you can only hope to be stunned rather than killed. They’re also not great places for minefields, either, because they can be so easily flanked.

Nutcrackers (Alinda, Ilwet Shuweisha, Mirbat Aza)
That’s probably a misnomer for these spaces as units in these spaces are more likely to be nutcracked, especially if they’re Axis. If the Commonwealth isn’t careful, though, a German recon unit can sneak through both of these to capture crucial terrain beyond. Many players make the mistake of garrisoning the adjacent spaces heavily, as if to set up this nutcracker, only to find that in the desert, the nut can often just speed away.
Gateway to Cairo (Wadi El Sakran, Abu Shawahid)
These two spaces really determine Axis exit in the absence of control of Alam Halfa. Wadi El Sakran is important because infantry from Abu Shamla cannot attack it in one turn. It’s a very difficult space for the Commonwealth to counterattack in general. Abu Shawahid gives the Axis recon forces a way to sneak off the map if the El Miqatta’at/El Egul ridge complex isn’t garrisoned (see above). The outcome of a closely contested campaign will often turn on events here and immediately east.
The keystones (Sidi Abd El Rahman, El Beida)
Sidi Abd El Rahman – so long north to south that it controls eastward exit from two separate westward spaces and abuts a third – is the lynchpin of the Axis position in all three Desert Fox scenarios. Early in the game, losing this space can trap the Axis entire northern wing, prevent resupply or replacements, and cause serious problems. In Second Alamein, quick reduction of the minefields here can once again jeopardize the whole northern part of the Afrika Korps, forcing it into a premature retreat or even wholesale destruction. In the campaign, there should be three minefields here well before the battle swings back to the west.
El Beida is really Sidi Abd El Rahman lite: while it only fully backstops a single space (Deir El Abyad), losing it can cause the Axis a lot of trouble. In Second Alamein it offers another way into El Quseir if the deirs are proving tough to cross.
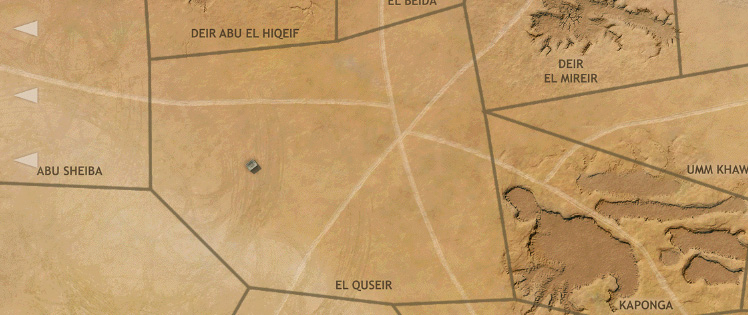
Bedouin bazaar (El Quseir, Gebel Kalakh)
Six tracks meet in El Quseir, reflecting the complex geometry this space controls. The Axis should keep this space counterattack-proof in the first week, as its capture by the Commonwealth is certainly worth more to the CW player than the 1 VP suffered for the eventual loss of the infantry unit that succeeds in doing so.
Gebel Kalakh has a single track running through it, but it is integral to El Quseir and the spaces will be forever linked in gameplay and history. With the Commonwealth holding Kaponga, the Axis have to be very careful to protect their supply through these spaces if they are pushing around the southern flank.
The twins: (Ghazal, El Kusha)
These are just transit spaces for reinforcements arriving in El Daba, or for Commonwealth forces attacking towards El Daba. El Kusha at least offers access to the protection of Sawani Samalus, but Ghazal offers nothing. It’s just a single space that leg units will have to traverse on the way to the front, with nothing to offer except dust and sand. By the time it comes into play, the coast road will have long ceased to carry supplies to forward Axis units. These spaces epitomize the North African campaign: monotonous, unremarkable terrain leading to and from battlefields that witnessed terrible misery.
Plains of destruction (Wadi El Giwiy, El Makh Khad, Qaret El Khadim)
At first glance, Wadi El Giwiy looks like a great place to anchor a defense. In fact, it’s terrible. If the Axis control Gebel Bein Gabir, they can assemble a combined arms force there and use the track into Alam Halfa to exploit in after combat. Commonwealth mines will need to be placed here quickly if circumstances dictate a fight for the space.

Qattara overlook (Deir El Risw, Deir Musa)
A single track leads into a narrow depression in the desert, bounded on the south by the impassable salt marshes of the Qattara Depression. And then ends. This makes these spaces ideal territory for recon units, unencumbered as they are by which way a track might lead. It also gives some protection from armor, as tanks can only enter these spaces from one direction. But ultimately both spaces are not defensive bastions: they’re waypoints on the trek east.
The trenches (Deir El Abyad, Deir El Mireir)
In the Ruweisat Ridge and Campaign scenarios, these will be tricky obstacles for the Axis to overcome, depending on how aggressive the Commonwealth is in its defense. In the Second Alamein and Campaign scenarios, these will eventually become Axis fortified zones, protecting the center of the line while the mobile units exit.
Oases in the desert (Sawani Samalus, Deir Abu El Hiqeif, Deir El Ragil, Deir El Shein)
These four deirs are not crossed by any tracks, so armor can never enter. This can make them tempting defensive positions when the tide of battle is sweeping past them. While this can be useful at times, German mechanized infantry can enter them just fine, and isolated infantry positions will get automatically redeployed unless there are also friendly mines in the space, leading to further strength point losses depending on how far behind the front they are. Knowing when to abandon the relatively safety of the deirs is part of the process of acquiring true desert savvy.
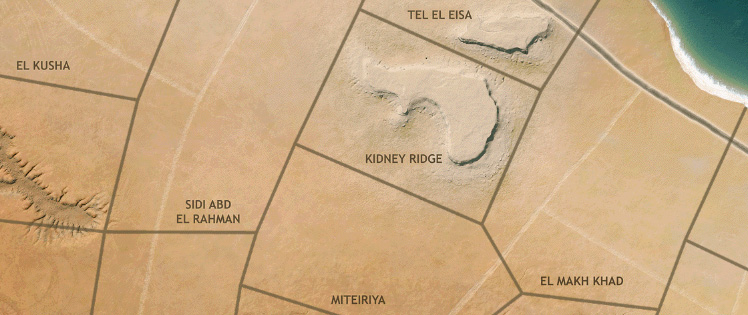
The ridge that wasn’t (Miteiriya)
If you read enough histories of the Battles of El Alamein, you will find many references to something called “Miteirya Ridge.” You’ll also find at least one claim that the feature known as “Kidney Ridge” wasn’t actually a ridge, but a depression. The fact that in Desert Fox, Miteiriya is not a ridge and Kidney Ridge is, just goes to show you that over seven decades after the end of the battle, it’s not easy to even agree on what the battlefield looked like. In Desert Fox, Miteiriya is a vulnerability, a gap between the two defensive features of Kidney Ridge and Deir El Abyad. It will likely be the focus of Commonwealth counterattacks when the pendulum has swung against the Afrika Korps.
The back door (Abu Sheiba)
The Axis exit spaces could be a category all to themselves. El Daba is the passage to safety for the bulk of the German mobile force in Second Alamein, and the mines placed on the northern ridges will protect units withdrawing along the coast road. Naqh Abu Dweis tends to only shelter the recon units and other fast forces that tend to operate along the sandy race that is the southern map. Abu Sheiba is the great protectress, welcoming escaping units from as far south as Gebel Kalakh as well as the sanctuary of Deir Abu El Hiqeif, where Axis motorized infantry can sometimes sit, safe from the upgraded combined rms Commonwealth armor, only to top off with some supply points and slip away safety. That same deir forces the Commonwealth off the tracks into Qaret El Augwat, or through what will likely be a heavily mined El Quseir. It may be at the end of the game, but Abu Sheiba is the start of the long road back to Tunis — fortunately not depicted here.
Canary in the coal mine (Qaret El Augwat)
This space formally separates the northern and southern Axis exit spaces. Once the Commonwealth is through to here, the Axis needs to exit. And fast. In the Second Alamein scenario, the Axis should be well-positioned on the road back to Tobruk by the time this space loses its blue hue.
The Borderlands (Bit Shah-Hat, El Kanabish, Qaret El Roni, El Kharita)
These map-edge spaces are likely to come into play only when one side or the other is on the brink of defeat.
And don’t even think of making “El Cannabis” jokes.

The hammer (Kaponga)
Kaponga is the Sword of Damocles hanging over the Axis southern thrust. It threatens both El Quseir and Gebel Kalakh, spaces that are absolutely essential to the Axis supply line should they push along the southern edge seeking an exit. The threat of an Allied elite infantry parking itself on one of these spaces forces the Axis to either reduce the mines (costly) or tie up covering forces (wasteful). It’s a rash Commonwealth player who prematurely abandons Kaponga.
The mallet (Deir El Munassib)
Also called “Kaponga Lite,” this space can backstop the Commonwealth position in the south if the Axis is heavily committing that way. But with a track running right through it, this can backfire when the Axis decides it’s worth sending a combined arms force strong enough to have the possibility of exploiting on to Abu Shamla. Defend well, or not at all.

The figurehead (El Alamein)
Desert Fox demonstrates just how much the Battle of El Alamein wasn’t actually about El Alamein. In the campaign, it’s just a spot on the map, albeit one with a lot of concentrated Commonwealth artillery. It’s this artillery, rather than any terrain feature or intrinsic value, which anchors the northern part of the Commonwealth line. If the mines are cleared and the space is captured, it’s amazing how open the northern part of the map becomes. The loss of the dispersed artillery bonus [see rule 10.3] is a not insignificant blow to the Commonwealth counteroffensive. While capturing El Alamein doesn’t win the Axis anything, the space is a meaningful objective and its capture is a big loss for the Commonwealth. In the Ruweisat Ridge scenario, it’s basically the game (yielding an additional 2 VP for the mines, for a whopping total of 12). In the campaign, it unhinges the entire Commonwealth northern flank, and the Commonwealth player will be forced to spend valuable mines to cover it. Otherwise, there isn’t much there but sand.

Invisible Elephant: The Qattara Depression
The geographical feature most important to Desert Fox isn’t a space and isn’t even “on” the map. The Qattara Depression runs for almost 200 miles along the southern edge of the El Diffa plateau, on which the battle was fought. It’s a giant salt marsh impassable even by loaded camels, and its northern edge is bounded by a sharp drop-off that rendered it even more inaccessible to the combatants. The battlefield of El Alamein was defined by this terrestrial anomaly: only here was the Commonwealth line anchored so that Rommel could not slip around to the south, as he had done at Gazala. If you feel boxed in as the Axis in this sea of sand, just remember: you should.
Wow, just finished reading this. Now I have a sunburn …
Posted by Will Scarlett | July 9, 2014, 6:37 pmWould you recommend Operation Battleaxe, Wavell vs. Rommel 1941 sold by Revolution Games as a solo playable North Africa game?
Posted by Cyrus | March 28, 2016, 8:47 pmWell, there is no bot, but the lack of hidden information means you can play each side in the classic “solo duotaire” style. I don’t know of many truly solo North Africa games. Dan Verssen Games does publish “Field Commander: Rommel” which is a solitaire game with a North Africa component.
Posted by Bruce Geryk | March 28, 2016, 10:31 pm